
Introduction
Hardwood floors are a timeless addition to any home, offering warmth, beauty, and durability. However, to truly make them your own and enhance their natural charm, staining is an excellent option. This ultimate guide will walk you through every step of the process; from preparing your floors to choosing the perfect stain and sealing for long-lasting protection, that is. If you’re looking to transform the look of your floors, learning how to properly stain hardwood floor is essential. This comprehensive guide provides the knowledge and techniques to achieve a professional finish, ensuring your floors look stunning for years to come. We’ll cover essential preparation steps, stain selection, the application process, and crucial sealing and maintenance tips. Get ready to elevate your floors and your home with the perfect stain.
Summary
- Preparing for Success: Essential Steps Before You Stain Hardwood Floor
- Choosing the Right Stain: Exploring Types and Colors for Your Hardwood
- The Application Process: Achieving a Flawless Stain Hardwood Floor Finish
- Sealing and Protecting: Extending the Life of Your Stained Hardwood Floors
- Troubleshooting and Maintenance: Addressing Common Issues with Stained Hardwood

Preparing for Success: Essential Steps Before You Stain Hardwood Floor
Achieving a flawless finish when staining hardwood floors requires meticulous preparation. This stage is arguably as important, if not more so, than the actual application. Proper preparation ensures the stain penetrates evenly, adheres correctly, and results in a professional-looking outcome. Neglecting these initial steps can lead to blotchy finishes, uneven color, and ultimately, a less-than-satisfactory result. At Mendes Wood Floor Blog, we always emphasize the importance of thorough preparation for a beautiful and long-lasting floor, of course.
First, ensure the room is properly ventilated. Open windows and doors to allow for airflow, specifically. Use fans to circulate the air if necessary. This is crucial for both your health and the drying process of the stain. Next, remove all furniture, rugs, and other obstructions from the room. Cover any remaining items, such as light fixtures or baseboards, with plastic sheeting and painter’s tape to protect them from accidental splatters or drips. After all, a clean and clear workspace is essential for efficient and effective work.
Before you even think about applying any product, perform a thorough inspection of the existing floor. Look for any signs of damage, such as scratches, dents, or gouges. These imperfections will become more pronounced after application, so it’s important to address them beforehand. Also, check for any existing finishes or coatings that may need to be removed. Failing to do so can prevent proper adhesion to the wood.
Next, deep clean the floor. Sweep, vacuum, and then use a wood cleaner to remove any dirt, dust, grease, or grime. For older floors, a more aggressive cleaning solution might be necessary. After cleaning, allow the floor to dry completely before proceeding to the next step. Moisture can interfere with the stain’s penetration and cause uneven color absorption. Here are some key preparation steps:
- Ventilate the room thoroughly.
- Remove all furniture and obstructions.
- Protect surrounding areas with plastic and tape.
- Inspect the floor for damage and existing finishes.
- Thoroughly clean the floor and allow it to dry.
Finally, sanding is a critical step in the preparation process. Sanding removes the existing finish, smooths out imperfections, and opens the wood pores, allowing the stain to penetrate deeply and evenly. Start with a coarse-grit sandpaper to remove the old finish and then gradually move to finer grits to achieve a smooth surface. Remember to vacuum thoroughly after each sanding pass to remove any dust. This ensures a clean surface for optimal results. Taking the time to prepare the floor correctly sets the stage for a stunning and durable stained hardwood floor.
Choosing the Right Stain: Exploring Types and Colors for Your Hardwood
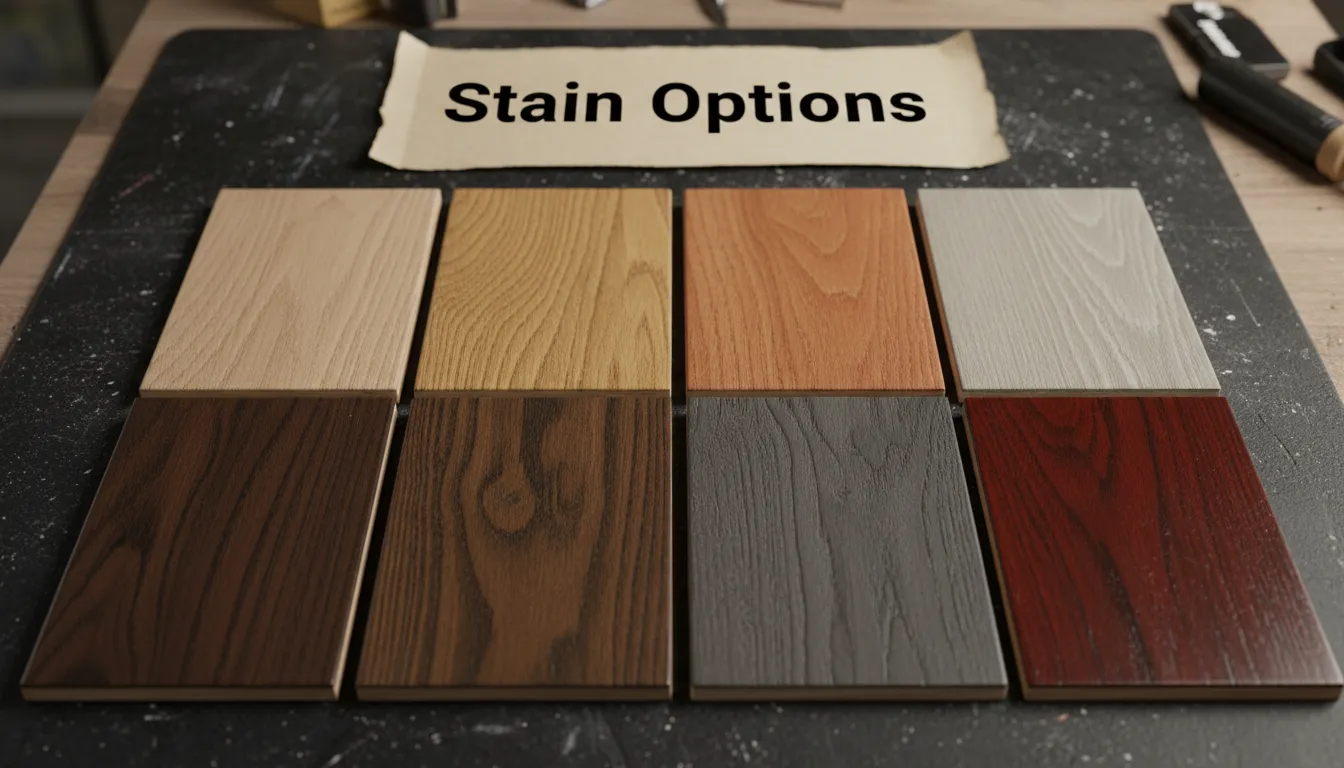
Selecting the appropriate stain is crucial for achieving the desired aesthetic for your hardwood floors. The stain not only enhances the wood’s natural beauty but also protects it from wear and tear. There are several types of stains available, each offering unique characteristics and benefits. Oil-based stains are known for their rich color and durability, penetrating deeply into the wood to provide long-lasting protection. Water-based stains, on the other hand, are low in VOCs and dry quickly, making them an environmentally friendly option. Gel stains are ideal for woods that don’t absorb stain evenly, while varnish stains combine color and protection in one step. In summary, consider the options carefully.
When choosing a stain, consider the type of wood you have. Some woods, like pine, are softer and require a pre-stain conditioner to ensure even absorption. Harder woods, such as oak or maple, may not need a conditioner but can still benefit from proper preparation. Understanding your wood’s properties will help you select the right stain for optimal results. Mendes Wood Floor Blog recommends testing different stains on a small, inconspicuous area of your floor before applying it to the entire surface. This allows you to see how the stain interacts with the wood and whether it achieves the desired color.
The color palette for hardwood floor stain is extensive, ranging from light and airy to dark and dramatic. Lighter stains, such as natural or whitewashed, can brighten up a room and create a more spacious feel. Also, they are effective at hiding imperfections and highlighting the wood’s natural grain. Darker stains, like ebony or walnut, add warmth and sophistication to a space. They can make a room feel cozier but may also show scratches and dust more easily. Ultimately, the best color depends on your personal preference, the style of your home, and the amount of natural light in the room.
Consider these factors when selecting a stain color:
- Existing Decor: Choose a color that complements your furniture, walls, and other design elements.
- Room Size: Lighter colors can make small rooms appear larger, while darker colors can add depth to larger spaces.
- Lighting: Natural light can affect how a stain color appears, so test it in different lighting conditions.
- Wood Grain: Some stains enhance the wood grain, while others create a more uniform look.
- Maintenance: Darker stains may require more frequent cleaning to maintain their appearance.
By carefully considering these factors and experimenting with different stains, you can achieve a beautiful and durable finish that enhances the overall look of your hardwood floors.
The Application Process: Achieving a Flawless Stain Hardwood Floor Finish
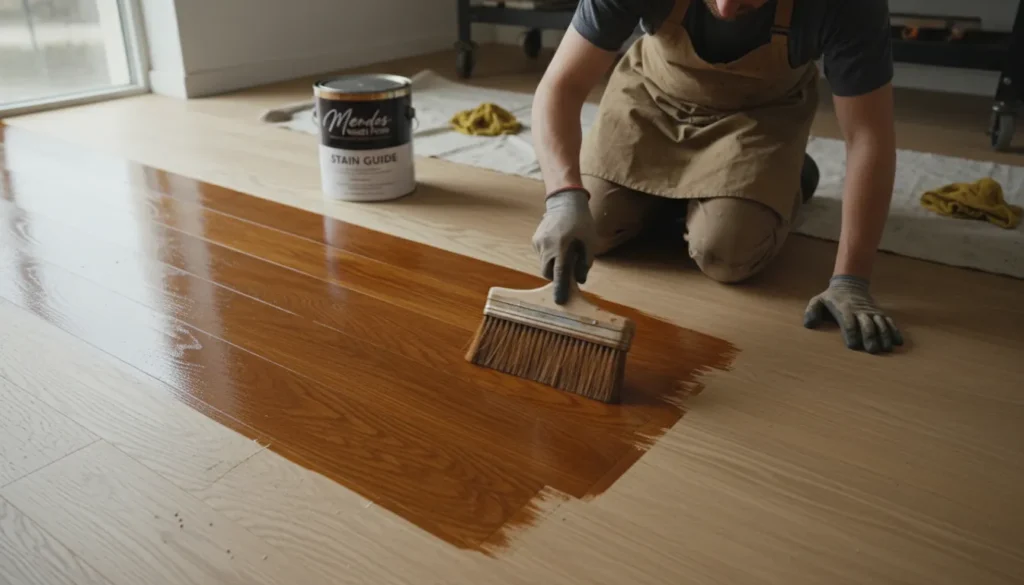
Achieving a flawless hardwood floor finish requires meticulous attention to detail and a systematic approach. The application process is where the true artistry comes to life, transforming a prepared surface into a stunning, durable floor. Before diving in, make sure you have all your materials ready: stain, applicators (brushes, rags, or pads), safety gear, and proper ventilation.
The first step is to apply the stain evenly. Whether you’re using a brush, rag, or pad, the key is consistency. Work in manageable sections, following the direction of the wood grain. Avoid applying too much at once, as this can lead to blotching or uneven color. As Mendes Wood Floor Blog often emphasizes, patience is paramount at this stage. Consider it carefully.
After applying the stain, allow it to penetrate the wood for the recommended time specified by the manufacturer. This dwell time is crucial for achieving the desired color depth. Once the appropriate time has passed, wipe off any excess stain with clean rags. Be thorough in removing the excess to prevent a sticky or uneven finish. A second coat can be applied if a deeper color is desired, repeating the same process.
Once the stain is dry, apply a finish to protect the wood and enhance its beauty. Choose a finish that is compatible with your stain and suitable for the level of traffic the floor will endure. Apply the finish in thin, even coats, allowing each coat to dry completely before applying the next. Lightly sand between coats to create a smooth surface for optimal adhesion. Consider these points:
- Ensure proper ventilation during application.
- Use high-quality applicators for a uniform finish.
- Follow the manufacturer’s instructions for drying times.
- Avoid applying finish in direct sunlight.
- Maintain a consistent room temperature and humidity.
Finally, after the last coat of finish has dried, inspect the floor for any imperfections. Touch up any areas as needed and allow the finish to fully cure before heavy use. Following these steps diligently will result in a beautifully stained and protected hardwood floor that will last for years to come. Remember, consistent technique and quality products are the key to a professional-looking result.
Sealing and Protecting: Extending the Life of Your Stained Hardwood Floors
Once your hardwood floor project is complete, the next crucial step involves sealing and protecting it. This process is vital for enhancing the durability and longevity of your newly stained floors. A high-quality sealant acts as a protective barrier against scratches, moisture, and everyday wear and tear, ensuring your floors maintain their beauty for years to come. Mendes Wood Floor Blog emphasizes the importance of selecting the right type of sealant based on the specific stain used and the level of traffic the floor will endure.
Choosing the appropriate sealant is paramount. Polyurethane sealants are a popular choice due to their exceptional durability and resistance to water damage, making them ideal for high-traffic areas. Water-based polyurethanes offer lower VOCs and a quicker drying time, while oil-based options provide a richer, amber-toned finish. Consider consulting with flooring professionals to determine the best sealant option for your needs.
The application process is critical for achieving optimal protection. Start by ensuring the stained surface is clean, dry, and free of any debris. Apply thin, even coats of sealant using a high-quality applicator, allowing each coat to dry completely before applying the next. Multiple coats are typically recommended to provide maximum protection. Lightly sand between coats to ensure proper adhesion and a smooth, even finish.
To further extend the life of your stained hardwood floors, consider implementing these preventative measures:
- Use doormats at entryways to trap dirt and debris.
- Place felt pads under furniture legs to prevent scratches.
- Regularly sweep or vacuum to remove abrasive particles.
- Avoid using harsh chemical cleaners; opt for pH-neutral floor cleaners.
- Clean up spills immediately to prevent staining or water damage.
Regular maintenance is key to preserving the beauty and integrity of your stained floors. Schedule periodic inspections to identify any potential issues, such as scratches or worn areas, and address them promptly. With proper sealing, protection, and care, your stained hardwood floors will continue to enhance the aesthetic appeal of your home for many years to come. It´s really worth it.
Troubleshooting and Maintenance: Addressing Common Issues with Stained Hardwood
Maintaining a beautifully stained hardwood floor involves addressing potential issues promptly to prevent long-term damage. One common problem is uneven color, which often arises from improper application or inadequate surface preparation. When this occurs, lightly sanding the affected area and reapplying stain can help blend the tones. Always test the stain on a small, inconspicuous area first to ensure color consistency.
Another frequent concern is the appearance of scratches and scuffs. These can be minimized by using felt pads under furniture legs and avoiding abrasive cleaners. For minor scratches, a touch-up stain marker that matches the floor’s color can work wonders. Deep scratches might require professional refinishing to restore the floor’s original look. At Mendes Wood Floor Blog, we advise addressing these quickly.
Water damage is a significant threat to hardwood. Spills should be wiped up immediately to prevent absorption, which can lead to staining or warping. Humid environments can also cause the wood to expand and contract, potentially damaging the finish. To mitigate this, ensure proper ventilation and consider using a dehumidifier in damp areas.
Here are some proactive maintenance tips to keep hardwood floors looking their best:
- Regularly sweep or vacuum to remove dirt and debris.
- Use a pH-neutral cleaner specifically designed for hardwood floors.
- Avoid using excessive water when cleaning; a damp mop is sufficient.
- Place mats at entrances to trap dirt and moisture.
- Trim pets’ nails to prevent scratching.
- Reapply a maintenance coat of finish every few years to protect the stain.
Finally, bubbling or peeling finishes indicate a more serious problem, often related to moisture or incompatible products. In such cases, professional assessment is recommended to determine the best course of action. Ignoring these issues can lead to extensive and costly repairs down the line. Proper maintenance and timely intervention are key to preserving the beauty and longevity of floors.
Conclusion
Staining your hardwood floors can dramatically transform the look and feel of your home. By following the steps outlined in this guide, from thorough preparation to careful application and proper sealing, you can achieve a professional-quality finish that enhances the natural beauty of your wood floors. Remember that patience and attention to detail are key throughout the entire process.
Proper maintenance is equally important for preserving the beauty and longevity of your stained floors. Regular cleaning, preventative measures, and prompt attention to any issues will ensure that your floors continue to look their best for years to come. Addressing problems like scratches, uneven color, or water damage quickly can prevent more extensive and costly repairs down the line.
At Mendes Wood Floor Blog, we are dedicated to providing you with the expertise and guidance you need to achieve stunning and durable flooring solutions. If you’re in the NY, NJ, or PA area and considering a professional refinishing or installation, don’t hesitate to reach out. Our team at Mendes Wood Floor is committed to delivering high-quality craftsmanship and exceptional customer service, using advanced dustless sanding technology to minimize mess and maximize precision. Taking the time to properly stain hardwood floor, combined with the right maintenance, will add value and style to your home for years to come.
Frequently Asked Questions
How important is preparing the floor before I stain hardwood floor?
Proper preparation is extremely important; it’s as crucial, if not more so, than the application itself. Thorough preparation ensures the product penetrates evenly, adheres correctly, and results in a professional-looking outcome. Skipping these initial steps can lead to uneven color, blotchy finishes, and an ultimately unsatisfactory result. Taking the time to properly prepare the floor sets the stage for a stunning and durable floor.
What type of sealant should I use after I stain hardwood floor?
Polyurethane sealants are a popular choice because of their exceptional durability and resistance to water damage, making them ideal for high-traffic areas. Water-based polyurethanes offer lower VOCs and a quicker drying time, while oil-based options provide a richer, amber-toned finish. Consider consulting with flooring professionals to determine the best sealant option for your specific needs to ensure optimal protection and longevity.
How do I address uneven color after I stain hardwood floor?
Uneven color is a common problem that often arises from improper application or inadequate surface preparation. To address this, lightly sand the affected area and reapply the product. Always test the product on a small, inconspicuous area first to ensure color consistency. Proper preparation and even application techniques are key to preventing this issue in the first place.
Why is sanding so important when you stain hardwood floor?
Sanding is a critical step because it removes the existing finish, smooths out imperfections, and opens the wood pores. This allows the product to penetrate deeply and evenly. Starting with a coarse-grit sandpaper to remove the old finish and then gradually moving to finer grits ensures a smooth surface for optimal results. Vacuuming thoroughly after each sanding pass is also important to remove any dust.
How can I prevent scratches on my newly stain hardwood floor?
Scratches and scuffs can be minimized by using felt pads under furniture legs and avoiding abrasive cleaners. For minor scratches, a touch-up product marker that matches the floor’s color can work wonders. Deep scratches might require professional refinishing to restore the floor’s original look. Regular maintenance, such as sweeping and vacuuming, can also help prevent abrasive particles from causing scratches.